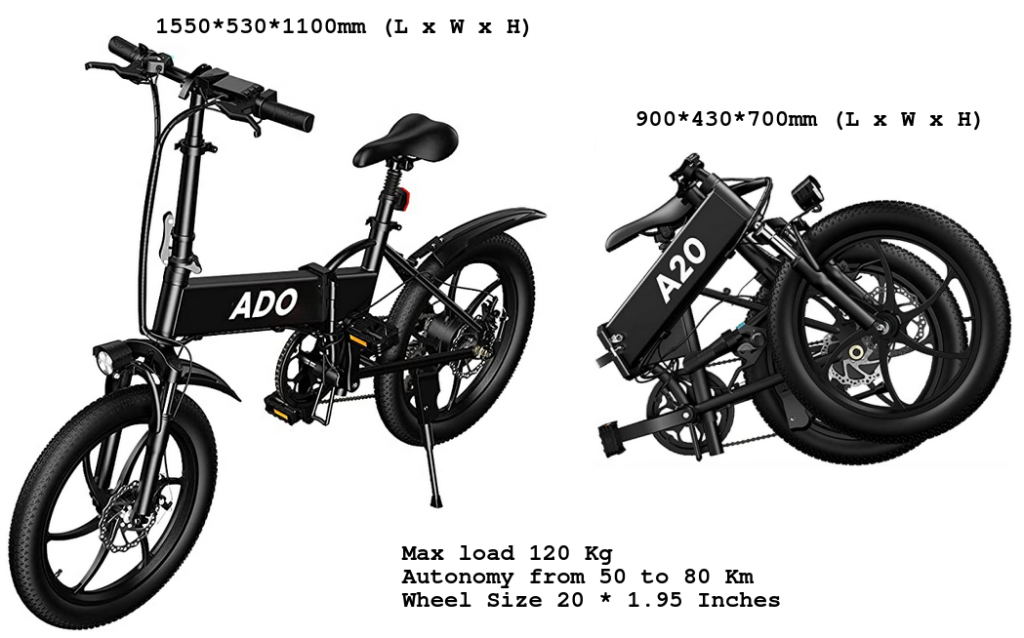
Real weight 22 Kg with battery.
Pedal assisted bicycle with also accelerator on the handlebar.
You can find ADO A20 for example here or here.
- Main features
- Our Impressions-and-Suggestions – Le nostre impressioni e suggerimenti
- Final considerations
- Install Rear light + Cable to tie the bicycle
- Spare parts used on ADO A20
- Computer codes
- Video Tutorial
- Support and secret code
Main features
| Gross weight | 25.5kg |
| IP Rating | IPX5 |
| Max. Speed | 25km/35km (enduser can unlock to 35km easily) |
| Transmission | Shimano 7 speed |
| Electric range | <60km |
| Assisting range | <80km |
| Charging time | 6 hours | |
| Payload | ≤120kg | |
| Material | Aluminum alloy |
- Transmission is 7-speed Shimano type
- Wheels 20″
- Motor
- Hall Brushless Gear DC Motor
- Rated Voltage 36V
- Rated Max Power 350W
- Torque 40 N.m
- Rated speed 380 r/min
- Battery 10.4A 36V, 800 times of charging and discharging
- Charger
- Input Voltage 100~240V, 50/60Hz
- Output Voltage 42V DC
- Output Current 2A
- Output Power 84W
- The electric bicycle features an aluminum alloy frame that offers strength, durability and a maximum payload of 120kg.
- Mechanical disc brake
- IPX5 waterproof
- Operating Temperature -10~40°C
- Mobile Phone Charging Station 5V/1A USB type A+
- System Control
- Turn On/Off Visible button on the speed control handle
- Riding Modes Switch
- Front Light Switch
- Display Type 886 Type HD LCD Display, Clearly under the sunshine
- Display Contents Speed, mileage, Gear, glitch
- Electronic booster starting point 5 KM start (CE )(Can change to 0KM start by enduser)
- Under voltage protection 31±2V
- Over current protection 15±2A

Our Impressions and Suggestions – Le nostre impressioni e suggerimenti
After having traveled more than 100 Km we can report our impressions and suggestions that are:
- Check the tightening of the wheel bolts, pedal cranks and brakes which were loose in our model.
- Controllare il serraggio dei bulloni delle ruote, delle pedivelle e dei freni che erano allentati nel nostro modello.
- Adjust the rear derailleur as it is not configured properly.
In Italian language, find the explanations on how to do it here and here.
More info are here. - Adjust the brakes and their centering on the relative discs.
More info are here.- Regolare i freni e il loro centraggio sui relativi dischi.
Maggiori dettagli si trovano qui.
- Regolare i freni e il loro centraggio sui relativi dischi.
- The saddle is quite stiff and we changed it to this one.
- La sella è abbastanza rigida e l’abbiamo cambiata con questa.
- During the various routes we also did some simple dirt roads in the woods and the bicycle behaved very well. It is certainly not made for challenging dirt roads.
- Durante i vari percorsi abbiamo fatto anche dei semplici sterrati nel bosco e la bicicletta si è comportata molto bene. Certamente non è fatta per strade sterrate impegnative.
- During the various routes we used pedal assist (level 1) for 65%, pedaling with accelerator for 5% and without pedal assistance (level 0) for 30%.
In these conditions we have done 40 km still having 2 battery notches.- Durante i vari percorsi abbiamo utilizzato la pedalata assistita (livello 1) per il 65%, pedalata con acceleratore per il 5% e senza pedalata assistita (livello 0) per il 30%.
In queste condizioni abbiamo percorso 40 km avendo ancora 2 tacche di batteria.
- Durante i vari percorsi abbiamo utilizzato la pedalata assistita (livello 1) per il 65%, pedalata con acceleratore per il 5% e senza pedalata assistita (livello 0) per il 30%.
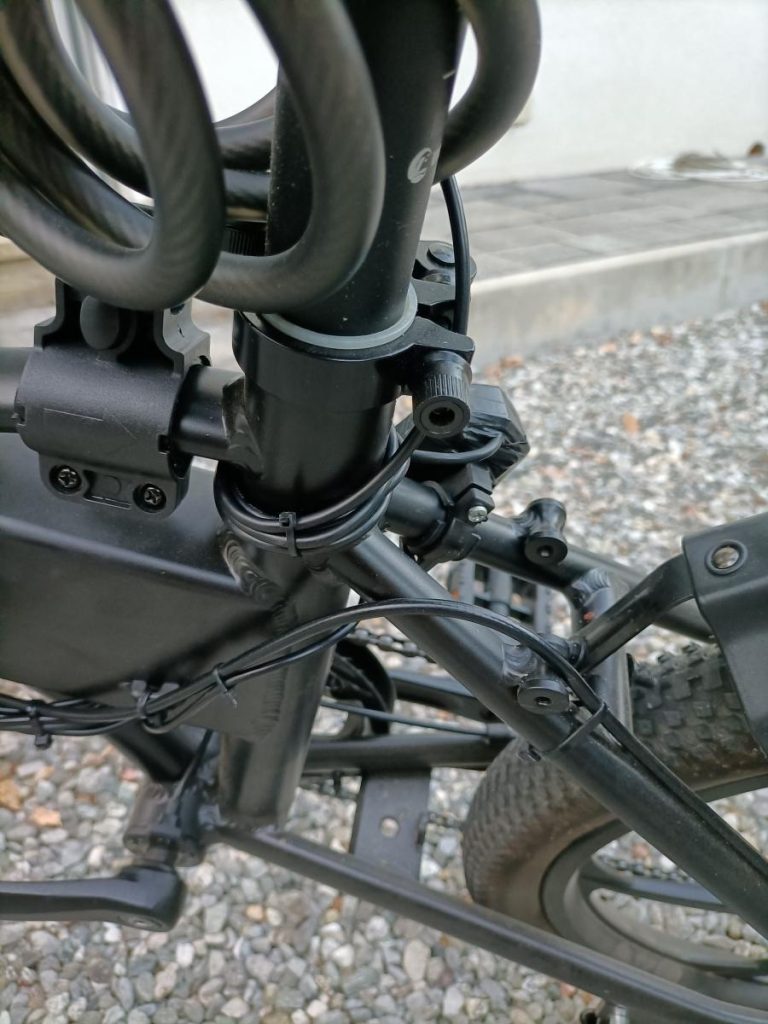
- If you notice vibrations during the front braking to the steering head you must tighten the relative clamping bolt, see pictures below.
- Se si notano vibrazioni durante la frenata anteriore alla testa dello sterzo dovete stringere il relativo bullone di serraggio, vedere immagini qui sotto.

Final considerations
- Definitely a good bike for paved roads with also a good autonomy, 40/50Km without excessive climbs.
However, it requires a minimum of manual skills to fix the gearbox, the brakes, the cranks and in our case the steering head.
Being resealable, it can be easily loaded in a Car or Van/Camper. - Sicuramente una buona bicicletta per strade asfaltate con anche una buona autonomia, 40/50Km senza eccessive salite sicuramente si fanno.
Richiede però un minimo di manualità per sistemare il cambio, i freni, le pedivelle e nel nostro caso il canotto di sterzo.
Essendo richiudibile si carica facilmente in Auto o in Van/Camper.
Install Rear light + Cable to tie the bicycle
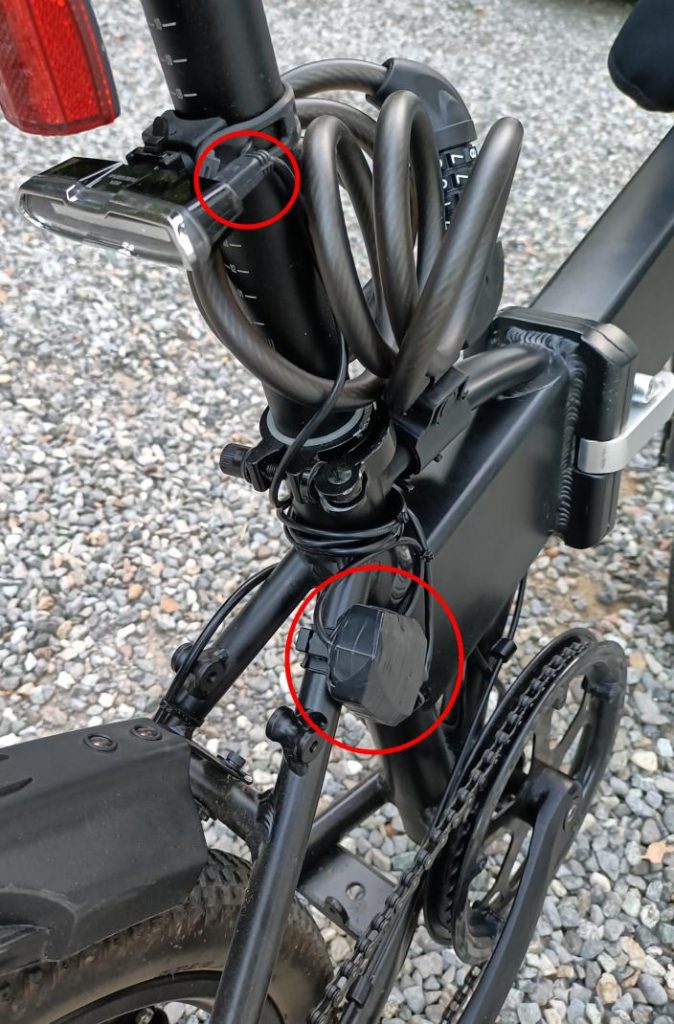
For the Rear light we suggest this because is rechargeable via USB.
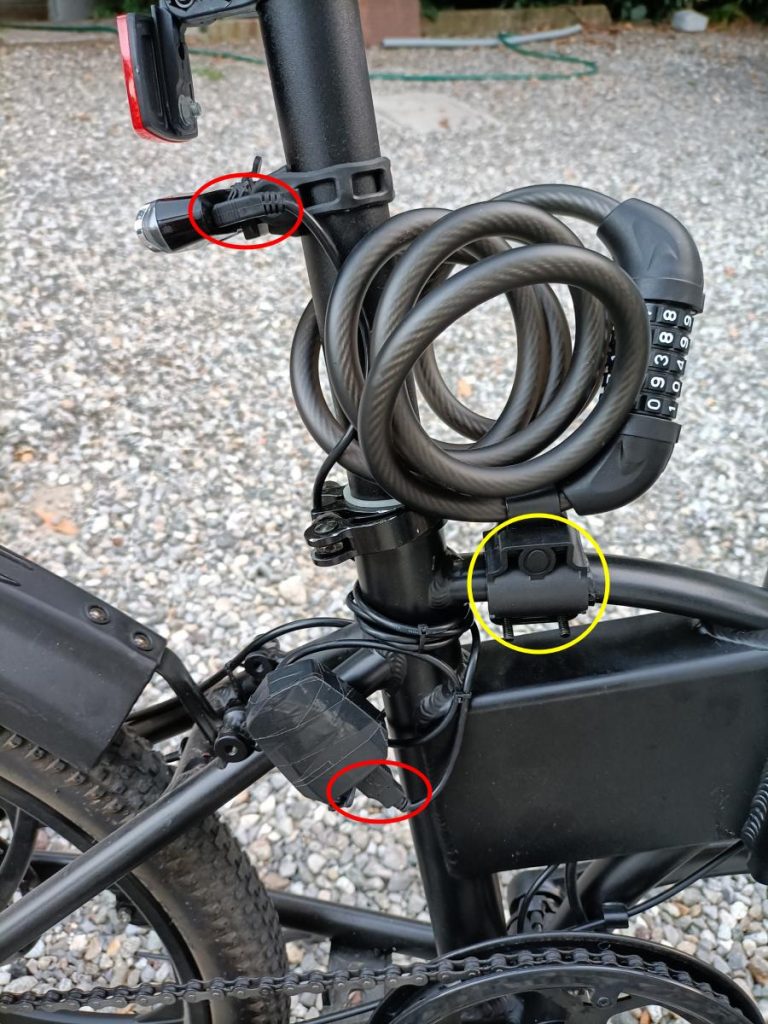
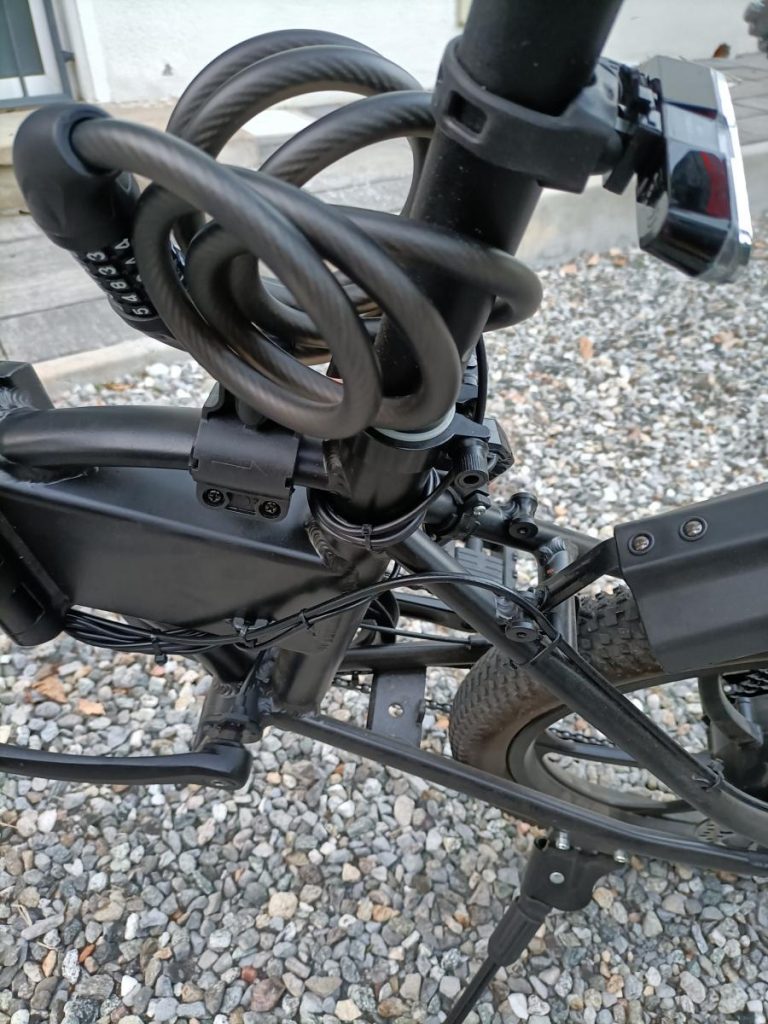
We will move the USB charger, present on the handlebar, to the rear area of the bicycle, see images below (red circle) and we will use the USB charger to always keep the rear light we installed charged.
Cable to tie the bicycle, we suggest to use this model because it is possible mount it as we show in the image below, see yellow circle.
Spare parts used on ADO A20
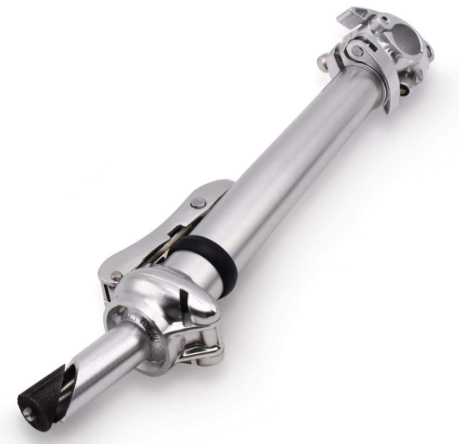
Handlebar stem, see here.
Unfortunately after only 300 km the right pedal bearing broke (the original ones are made of plastic) so I replaced them both with these with aluminum body and always foldables.

I decided also to change the bicycle saddle with this that is cushioned and padded bicycle saddle.

II also adopted a bicycle saddle memory foam cover, like this (XL model). All this to make the saddle more comfortable without having to use the appropriate cycling shorts.

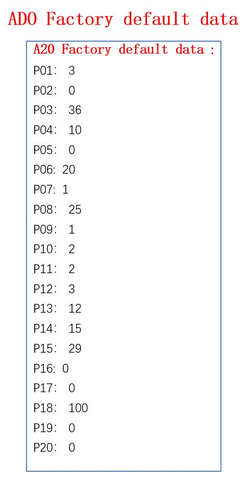
Computer codes
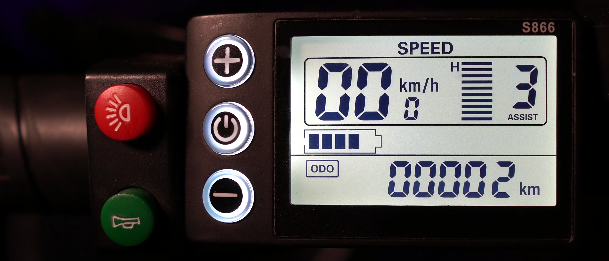
For enter in SetUp push at the same time the + and – for some seconds.
For move between the parameters push On/Off button.
- P01 – Level of display light – Intensità luce del display
- P02 – Odometer measurement unit – Unità di misura del contachilometri
- P03 – Battery voltage which must be 36 – Tensione della batteria che deve essere 36
- P04 – Automatic shutdown timer – Timer di spegnimento automatico
- P05 – Setting of assistance values, 3 is default – Settaggio dei valori dell’assistenza, 3 è il default
- P06 – Wheel diameter, default is 20 – Diametro della ruota, default is 20
- P07 – Number of motor magnetos, unused, do not change – Numero di magneti del motore, non usato, non modificarlo
- P08 – Maximum speed limit – Limite di velocità massima che in Italia è 25 Km/h
- P09 – Valore che indica da che velocità iniziale entrerà la pedalata assistita
0 == acceleratore subito disponibile
1 == si imposta una velocità minima dopo la quale si potrà usare l’acceleratore - P10 – Driving mode but nothing changes do not touch, default is 2 – Modalità di guida ma non cambia nulla non toccare, default è 2
- P11 – Sensitivity for assisted pedaling, default is 2, the higher the value and the later the motor will activate – Sensibilità per la pedalata assistita, default è 2, maggiore è il valore e più in ritardo si attiverà il motore
- P12 – Acceleration speed, the higher it is, the faster it accelerates – Velocità di accelerazione, più alto è e più accelera rapidamente
- P13 – Assistance sensor, do not modify it – Sensore di assistenza, non modificarlo
- P14 – Amperage at which the controller works, do not change it – Amperaggio a cui lavora il controller, non modificarlo
- P15 – Battery discharge limit which by default is 29, it is better not to change it. If you set it too low you risk damaging the battery – Limite di scarica della batteria che di default è 29, meglio non modificarlo. Se lo si mette troppo basso si rischia di danneggiare la batteria.
- P16 – Reset the odometer – Azzera il contachilometri
- P17 – Set cruise control, better not touch it – Imposta il cruise control, meglio non toccarlo
- P18 – It is a ratio between the measured speed and the displayed speed and is used to fix any discrepancies – E’ un rapporto tra la velocità misurata e quella visualizzata e serve per sistemare eventuali discrepanze
- P19 – Assisted mode, 0 is the default, better not to touch it – Modalità assistita, 0 è il default, meglio non toccarlo
- P20 – Communication mode between computer and controller, default is 0 and it is better not to touch it – Modalità di comunicazione tra computer e controller, default è 0 ed è meglio non toccarlo
The video in Italian language is here.
Video Tutorial
Support
To contact ADO support in Europe: Support@adoebike.com
